Quick pre-check
A quick baseline of what you already know — no grade, no pressure. Totally optional, and you can skip it.
💾 Sign in first so your results save to the dashboard.
Introduction
Project manager responsibilities
The project manager is responsible for managing all aspects of solar energy projects – from planning to execution to completion. Project managers must not only plan and document the project, but also execute it effectively within the constraints of scope, time and budget.
The project manager requires a diverse set of skills, including technical expertise, good business awareness, and the ability to manage people effectively. Additionally, they must possess various soft skills to successfully lead their team and oversee the project.
As a project manager, your responsibilities include drawing up contracts, managing schedules, allocating and handling resources, setting and tracking timelines, and communicating with stakeholders.
Planning

Planning is the first and most important step in managing a project. As part of the planning process, you will do the following:
Define the scope and the goals of the project.
The EPC process

Solar projects are a type of EPC project. In the solar industry, ‘EPC’ stands for ‘Engineering, Procurement and Construction’. EPC provides an integrated and comprehensive approach to project delivery.
The first step, Engineering, refers to getting the project scope and engineering designs right according to the client’s and the project’s requirements.
The second step, Procurement, involves contracting people, resources and materials that the project needs.
The third step, Construction, is the actual build and execution of the project. Within this step, you will want to commission the project and do quality checks of the project at the end.
It is important to note that EPC is an iterative, not a linear process. This means that engineering, procurement, and construction may at times happen simultaneously.
Step 1: Engineering – 1

The first step of the EPC process is Engineering.
Professional engineers must review and approve critical aspects of the job.
If the solar installation is less than 10 kW in size, you don’t need a professional engineer to stamp and approve the project design.
If the project is one with a scope over 10 kW, then you would need a professional engineer (for example, an electrical engineer) to stamp and approve the project design.
Small projects of less than 10 kW, often called ‘cookie cutter’ projects, don’t require a lot of engineering because you can follow the standard Electrical Safety Authority Code.
Step 1: Engineering – 2
In Engineering, there are certain codes you need to be aware of as a project manager.
Electrical AC/DC codes fall under the Ontario/National Electrical Code, and the Electrical Safety Authority. The latter has specific codes that you must abide by, such as how big the cables have to be, how they are connected, where the equipment can be built.
You also must be aware of Building specifications, such as the Ontario/National Building Code. You should make sure that a structural engineer will review the extra weight that you are putting on the roof or the ground is the proper wind load or snow load.
Environmental issues are equally important. Make sure you are doing your environmental surveys. This could range from sound testing to surveys for endangered species or wildlife that could be affected by your project.
Geotechnical issues come into play if the project involves anchoring something to the ground or digging into the ground, you need to get soil samples and check soil conditions.
The codes to be applied depend on the type of project and the level of engineering that is needed.
Project manager responsibilities review
What is the full form of ‘EPC’?
The EPC process review
Which statement is true about the Engineering, Procurement, and Construction (EPC) process in solar projects?
Step 2: Procurement – 1

The second step in the EPC process is Procurement. The two key elements you will need at this stage are equipment and contractors.
You must create Request for Quotes (or RFQs). The RFQ includes the scope of work and expectations of timeline for the potential contractor. These are sent to contractors or suppliers to request for quotes for either services or materials.
After you receive responses, choose qualified contractors. This should be someone reputable or someone reliable you have worked with in the past. If you have not worked with them before, ask for references from previous jobs that they have done. You can also call to see if previous clients are satisfied with their work.
Do your due diligence by asking relevant questions.
Step 2: Procurement – 2

Procurement, therefore, is the act of obtaining or purchasing goods or services.
The process to follow for procurement is to first identify the materials and services you require. Then determine which goods and services can be grouped.
Ask for a Request for Information (or RFI) from suppliers. Or you could also ask for a Request for Proposal (or RFP) to bid on the project.
Select a supplier using a Request for Quote (RFQ) or RFP to bid on the project.
Approach multiple suppliers/contractors to get quotes. That way, you can choose the best pricing, services and materials for your project.
The difference between RFI, RFQ and RFP

We have spoken of three different types of ‘Request’ documents to procure either goods or services from contractors/suppliers.
RFI or Request for Information
Common items and services

In solar projects, some common items for equipment procurement are, among others:
Some common services for contractor procurement are, among others, those requiring:
Engineering – Load analysis
Let’s circle back to the construction process to discuss some subprocesses which a project manager needs to be aware of.
The Load Analysis/Electrical Bill Analysis requires how much energy the building is consuming in kWh. The initial step is to figure out how much energy you need and how big a solar system you need to build.
Then you have to match up a design with an electrical and structural site evaluation. For instance, you may have a building that requires 20 kW but there is not enough roof space for an install. There may already be gas lines or air-conditioning units on the roof preventing solar panels to be placed in those areas. In that case maybe a ground system is a better option or a different-sized solar system.
There are some Hydro One unique terms that you will hear, such as Hydro One Connection Impact Assessment (CIA), Form A, Form B, Form C. Each form relates to a different process with Hydro One:
Form A
Preliminary Consultation Report
Form B
CIA Application for 10 kW and Up
Form C
CIA Application for 10 kW and Below
Engineering – Load analysis
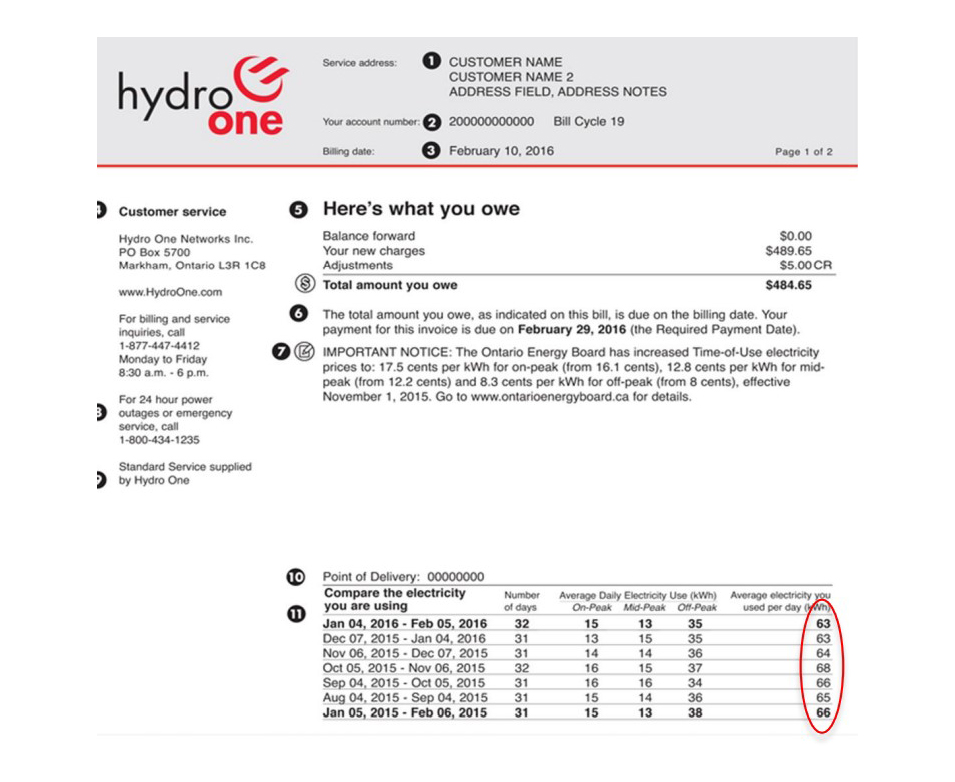
Earlier, we discussed consumption data analysis. You will want to start off with this when designing the size of the system. Let’s check this in more detail.
When designing a net-metered project, the process always starts with calculating how much power the location consumes. The most effective way to determine consumption is through past electrical bills.
Let’s say you have finalized the building on which you want to put the solar panels. Get some past electrical bills for the building. Then calculate how much power the building consumes at present. This will help you calculate if it makes sense to offset the building’s energy cost with a solar install.
Let’s look at this example of someone’s electrical bill. You will use bills such as this to analyse usage data. This data could then be given to a PV systems designer or be uploaded to a solar designer software to build a solar system that would offset, say, 80% or 100% of this energy consumption.
It is always advisable to reduce consumption by increasing efficiency, e.g., by using Energy Star appliances and LED lighting.
Engineering - On-site data collection

Your next step is to do on-site data collection. You will need somebody to physically go to the site to take some key measurements, such as the building dimensions, external dimensions, distances to the electrical room, roof dimensions, pitch, measurements of roof trusses, azimuth, etc. You also need other details such as the building’s blueprints and structural designs, photos of the electrical room, etc.
The azimuth is the compass direction that the solar panels face. Solar panels should face directly into the sun to optimize their output. So, the panels should face south to produce the most electricity over the course of a day and optimize the capture of solar radiation. Note that the solar panels should not face north.
Once you have photos and detailed information of the structure, you should pass them on to the structural engineer. You also need someone to go through the site data collection form and fill out all this information. These key components are needed to advance to the next stage of construction. On-site data collection also comprises collating feedback from the building manager and key staff. This could include their concerns, planned projects, future building use, and roof issues or leaks, etc.
Don’t forget to note down the contact information for staff members and key personnel for future reference.
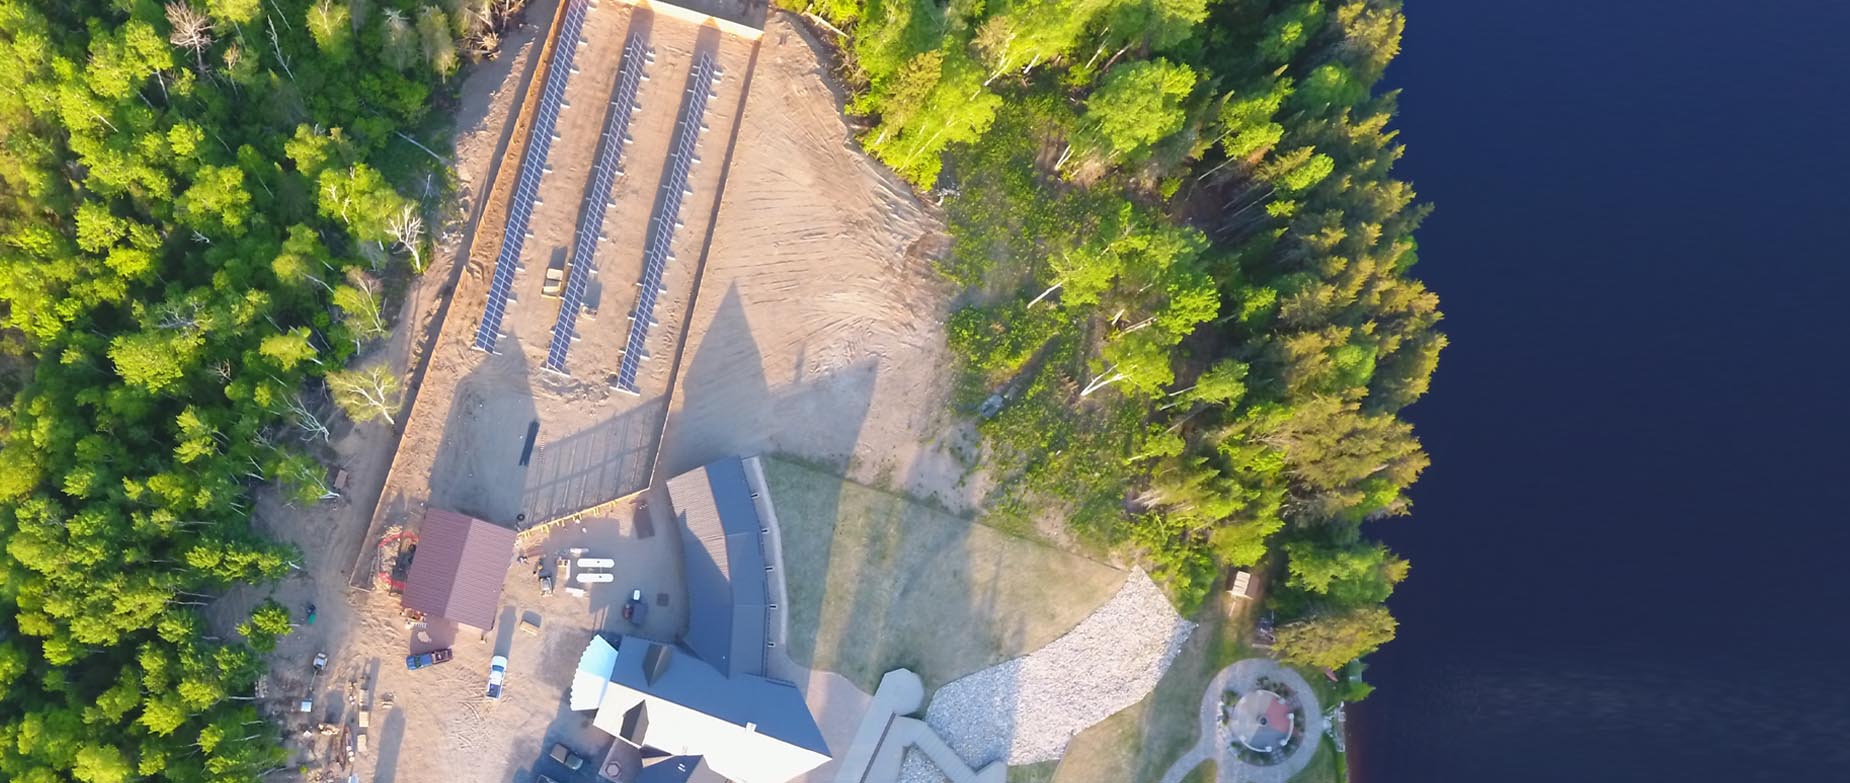
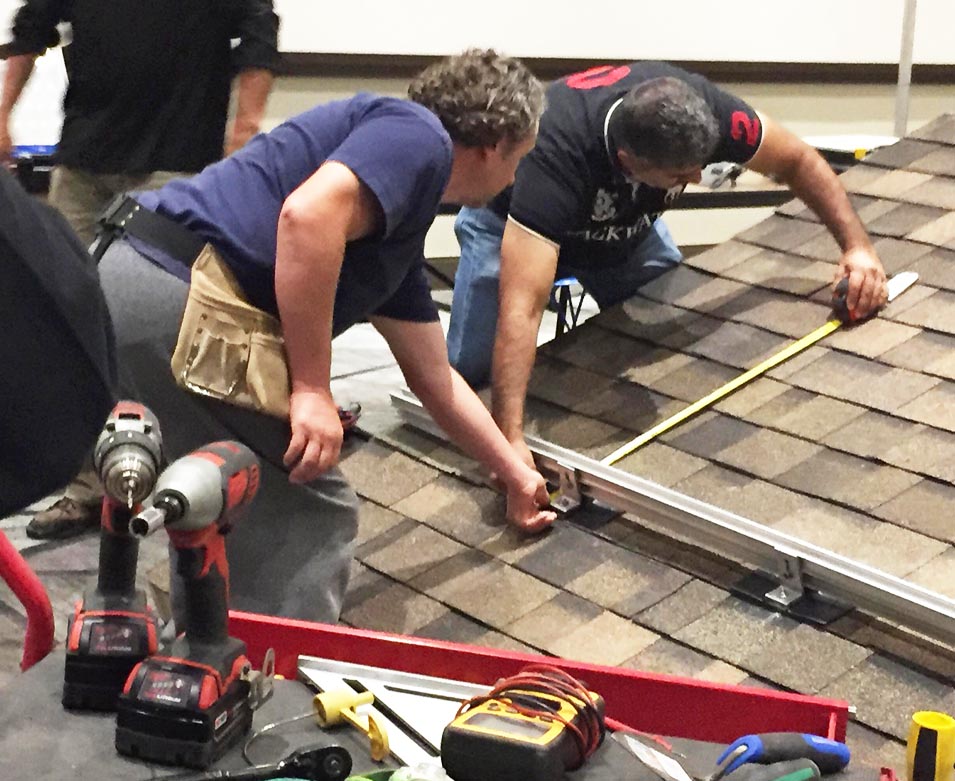
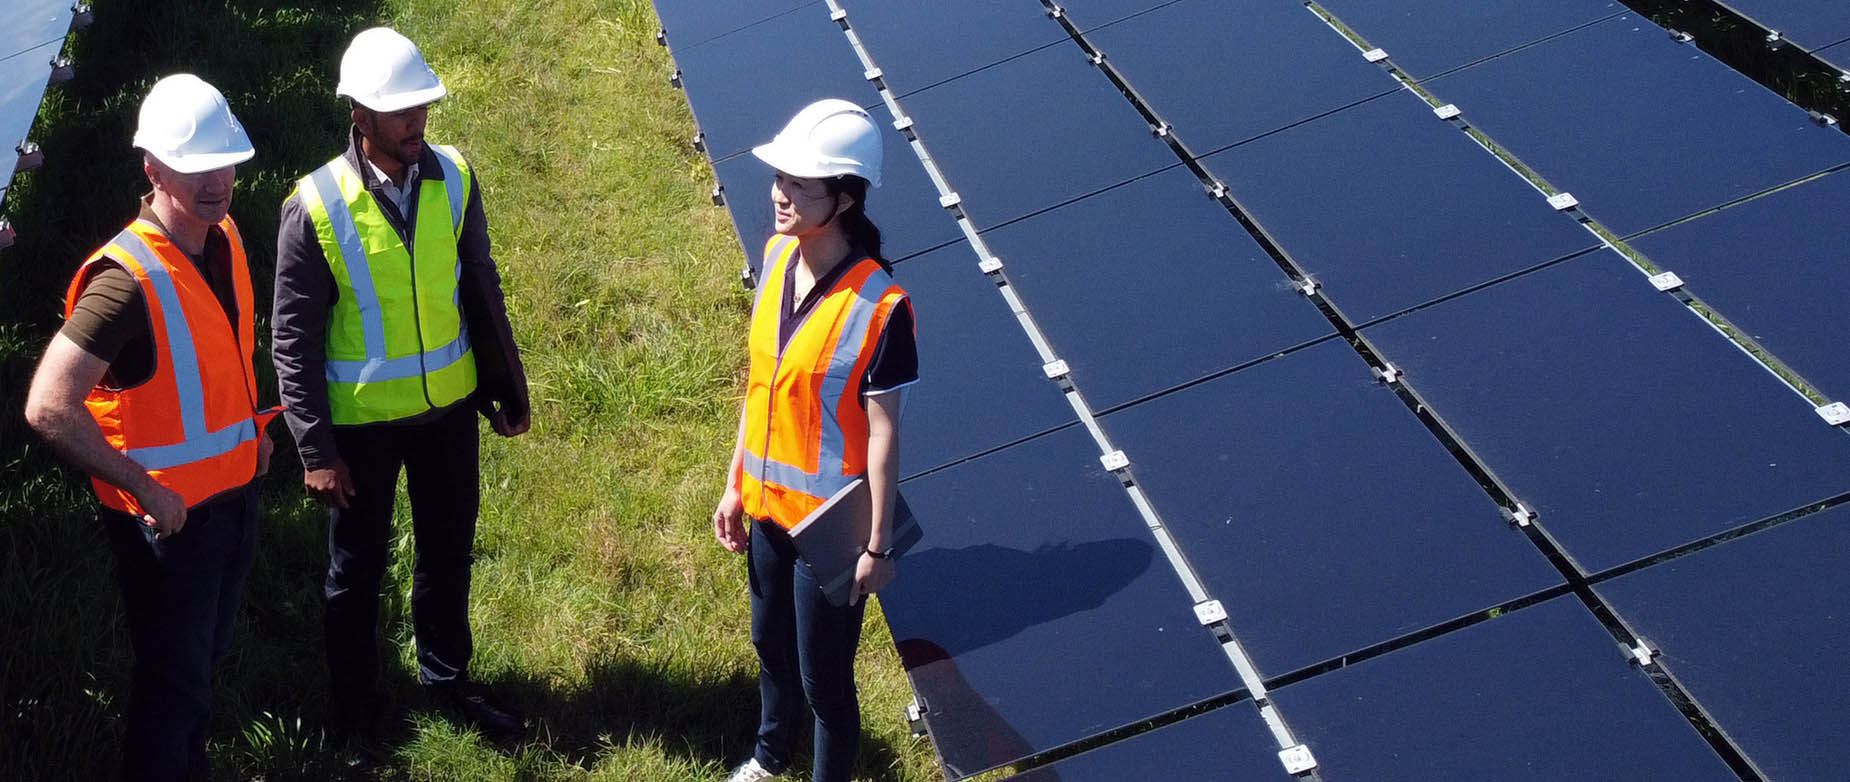
Construction process: Site evaluation

A site evaluation is necessary for collecting all the details for the engineers, determining the best location for solar arrays; for collecting measurements for module placement; the roof design and present condition; and shading issues, among other information. This will all help in designing an appropriate system.
You can also use the site evaluation visits to educate the client about the project.
Here are some photos of what a site evaluation might look like.
This first photo is of rooftop space.
You can collect this data from Google earth imagery. Depending on the project, such photos may or may not be always needed.
This second image is of collected information - Measurements, module placement, systems etc.
This third photo is of an attic space.
This is necessary to take measurements of the roof trusses.
These are critical for structural engineers to calculate whether the building is capable of supporting the extra weight of the solar installation.
Preliminary engineering/design

At this point in the project, you should have completed some essential prerequisites and be ready to move into the preliminary engineering or design stage. At this point, you have identified the primary site, reviewed the consumption and looked at system sizes.
The site evaluation, consultations with key personnel, as well as preliminary system sizes and layouts, should be complete. Hydro bills for the previous one or two years should have been analyzed to create a correctly sized design.
You should have identified primary building sites and received preliminary structural approvals.
Engineering - Building Approval Form

The next step is completing the Building approval form.
This approval form is usually a one-page document which has general details about the array location, the size and configuration of the array, who the signatory would be, information to consenting parties about project status, opportunities to make changes, etc.
The image here is what a building approval form might look like. At this point, it is usually the building manager who would give approvals for the construction on the rooftop. All parties should sign off on the next steps.
Engineering - Connection impact assessment
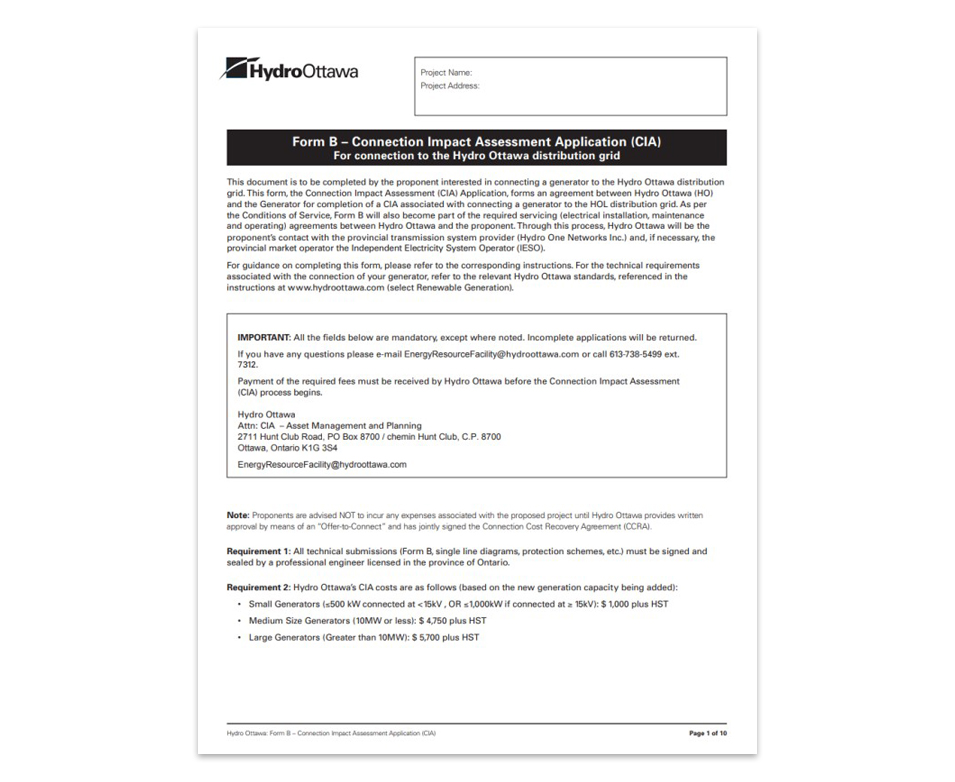
The next step in the process is getting your approval for connection from the local distribution company. This is called a Connection Impact Assessment, or CIA.
This particular example is of one for larger projects, but there are variations of these types of forms. You have to fill out the whole form. Sometimes you have to pay the utility to submit this form.
If your solar system is exporting to the grid, if it is capable of pushing power onto the electrical grid, then it needs approvals from a local distribution company to do that. If the solar system is non-exporting, which means that it is not pushing any power to the grid, then you do not need a connection approval.
So the purpose of a CIA is to:
Provide a more detailed assessment of a project’s impact to the grid. Include a technical report outlining project feasibility. Detail technical specifications needed for the project. Specify the impacts the project would have on the distribution grid.
Step 2: Procurement – purchase materials

The next step is to purchase materials.
You will then have to schedule the deliveries from vendors.
You will also have to coordinate with delivery persons to ensure that deadlines are being met.
Once you start receiving deliveries, checking storage and security is also part of your responsibilities.
You will now have to schedule the work to be done by coordinating with your vendors.
Request for quotes (RFQs) review
What is the primary purpose of creating a Request for Quotes?
Contractor procurement review
Which of the following is NOT typically included in contractor procurement for solar projects?
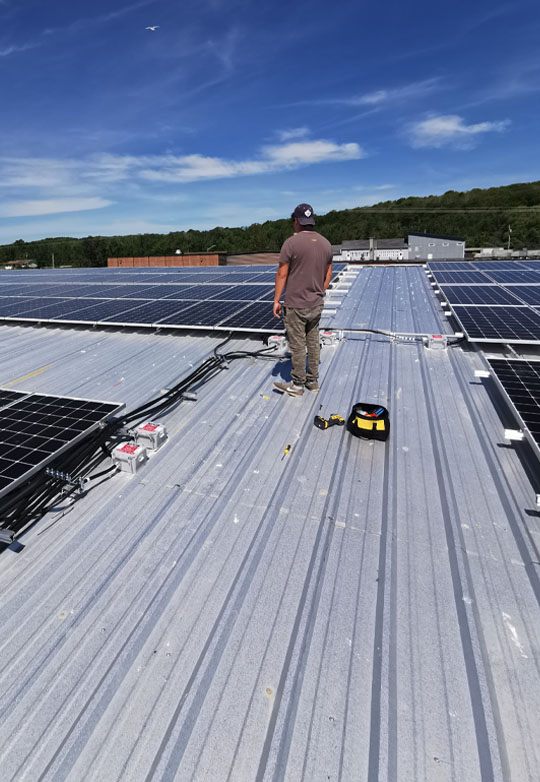
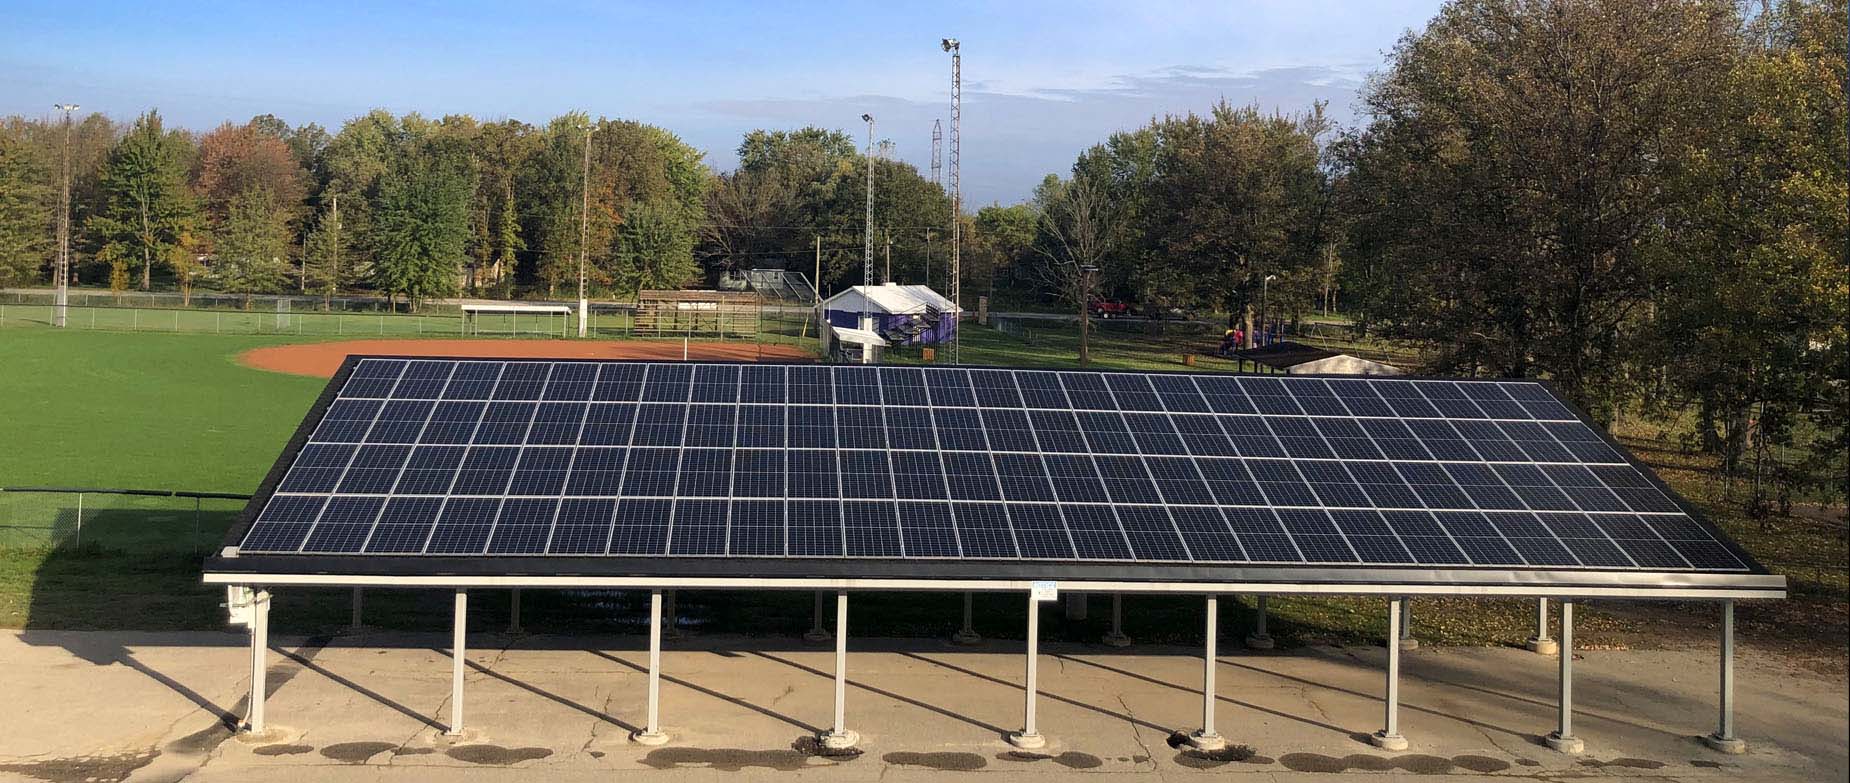
Step 3: Construction – 1
By now you have done your legwork and planning in the first two steps, and everything is in place. It is now time for the final step of the EPC process – Construction.
This is an important step because you are now mobilizing expensive contractors and materials, and you want to make sure that you mitigate risks.
During the construction stage, it is essential to have specialized personnel and follow established safety regulations.
You must set your construction timeline. The permits should be in place and the contractors selected.
You should distribute a clear set of plans and schedules to all stakeholders. They should know the schedule to follow for the build and when it needs to be completed. Everyone must know when to get to site, and when equipment will be ready at the site.
Remember: You can schedule tasks sequentially or in parallel. You will see more information about this in the following screens.
Step 3: Construction – 2
The foundation – whether for a ground or rooftop install – will now be started.
The DC installation, which includes solar racking and solar modules, is completed first. The electrician installs the rapid shutdown and the inverter for the AC installation.
Always make sure that system commissioning has been scheduled. Commissioning is the process of verifying that the solar system is installed correctly and operates as intended. You may have to submit a commissioning document saying that electrical engineers have checked the system or that inspections have been done and the site is safe to operate including an ESA authorization certificate.
You will also now connect to the grid. Depending on the project, you must decide whether you need to shut the power to the building, or not, to be able to make the connection.
Project approval process

To achieve approval for a solar installation project means involving numerous stakeholders, government agencies and professionals.
There is an extensive number of approvals and steps that need to be taken to successfully complete your project.
The process starts off by discussing the project with Chief and Council and goes all the way through to the last step, which is getting connection approvals to energize your system.
Project approval process – the staircase
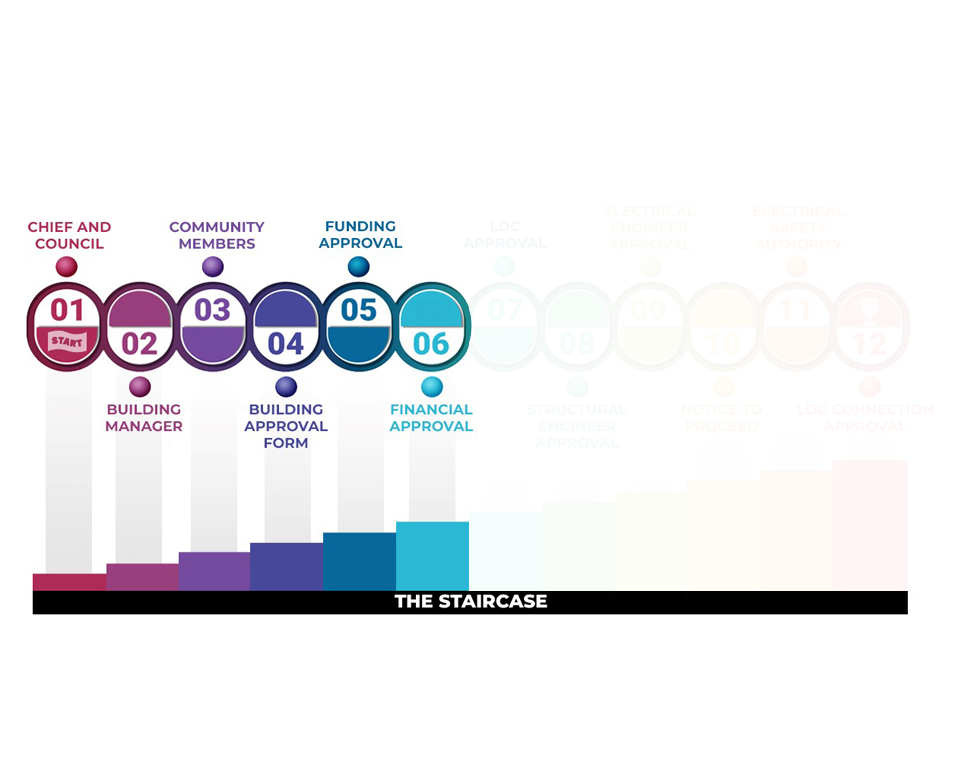
At a high level, there are lots of people who need to be involved, be aware of your project and approve of it. Anyone who would be affected by your project would need to be aware and be on board with the project.
Step 1: Make a presentation to Chief and Council for approval. They might be potentially financing or funding the project as well. Step 2: Consult building managers on the suitability of using structures, especially if it’s a rooftop solar installation on a particular building. Step 3: Speak to community members to educate them on project details and benefits. Make them part of engagement sessions. See if they have questions and concerns about the project. Step 4: Arrange for a Building Approval Form, where a building manager will sign off on agreeing to the high-level details. Step 5: Secure funding through government agencies, if required. Step 6: Secure financing, if required.
Steps 5 and 6 are usually taken care of ahead of time so that the financing and funding are in place before you get too far in your project.
Project approval process – the staircase (cont’d.)
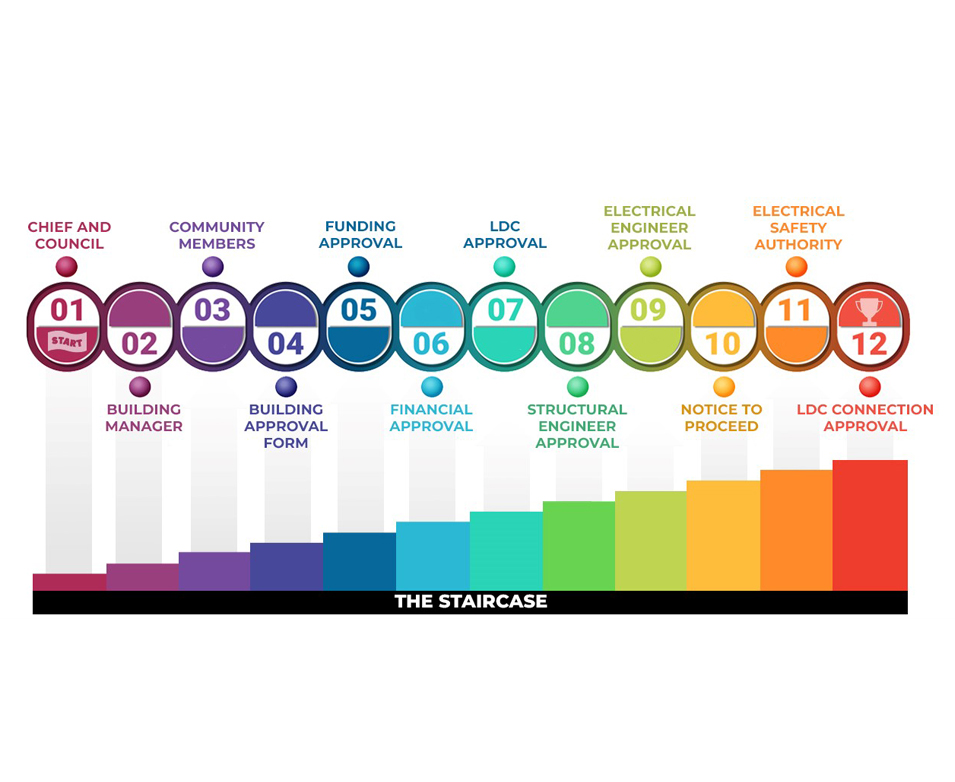
Step 7: Have the Local Distribution Company (LDC), approve the connection. For instance, if you want a net metered solar installation, you will need approval from your LDC. This might be Hydro One. Step 8: If you are doing a rooftop solar installation, structural engineers will need to be involved. A structural analysis is necessary to make sure it is safe to add weight to the roof. Step 9: An electrical engineer must approve the site or provide stamped drawings. This step is needed only for large projects (above 10 kW). Step 10: Ensure that a Notice to Proceed is issued. This is the last approval before equipment is bought and the project continues to installation. Step 11: Check that Electrical Safety Authority (ESA), permits have been pulled and inspections made on schedule. The ESA comes in during, and at the end of, the installation to conduct safety checks and ensure that your installation is compliant with the Ontario Electrical Code. Step 12: Coordinate with the local distribution company to give connection approval and energization to the grid.
Note: The terms ‘LDC’ (or Local Distribution Company) and ‘Utility’ are interchangeable.
Project approval process: Notice to proceed
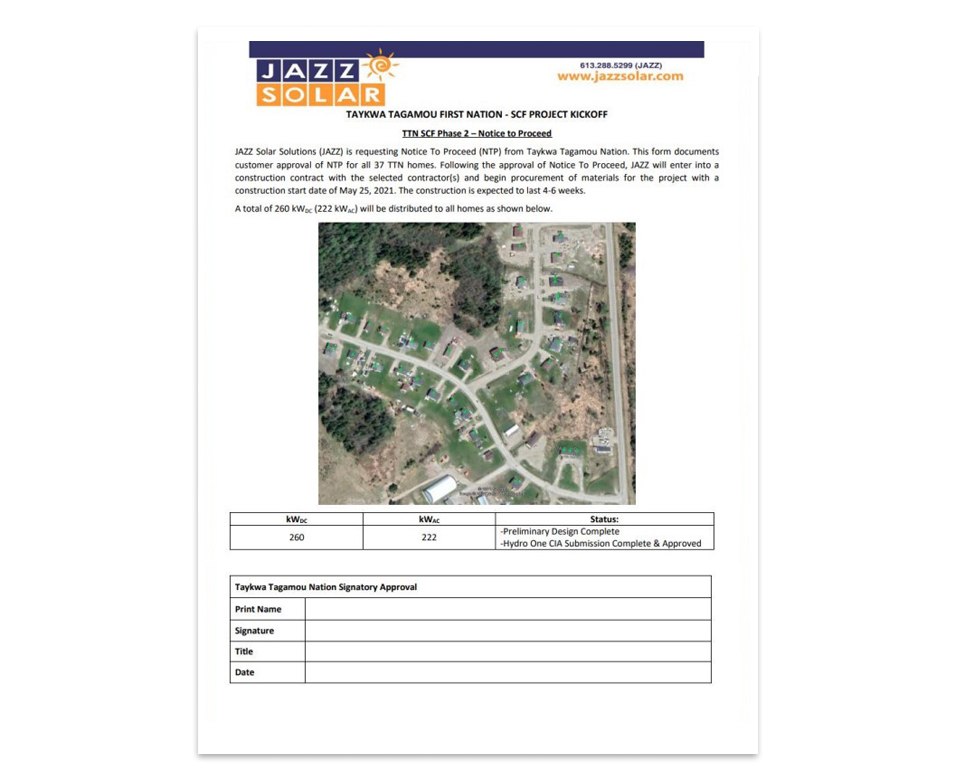
Next up is the Notice to Proceed document, or NTP. This is what it looks like. It is very similar in format to the building approval form. The purpose of this document is to:
Get customer approval. Record project details. List construction timelines.
Essentially, the NTP, as the name suggests, is your final sign off from the community and the appropriate signatories before you actually mobilize all of your resources and materials to the site. Because it is very costly to do so, you want to make sure there are no loose strings or hiccups. This document helps prevent that.
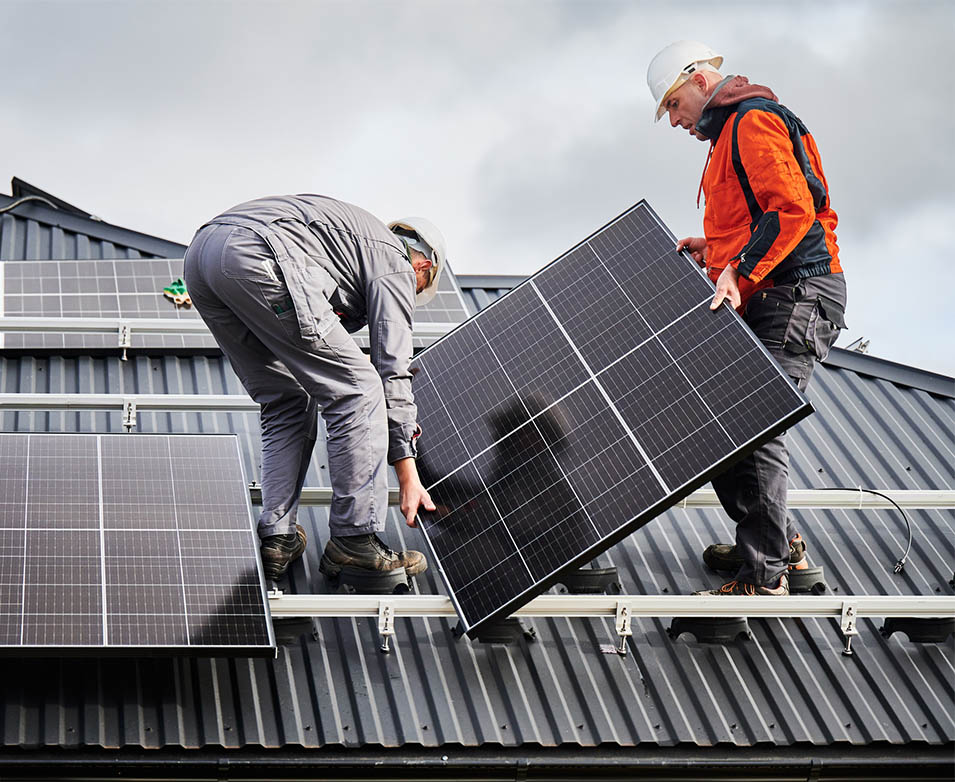
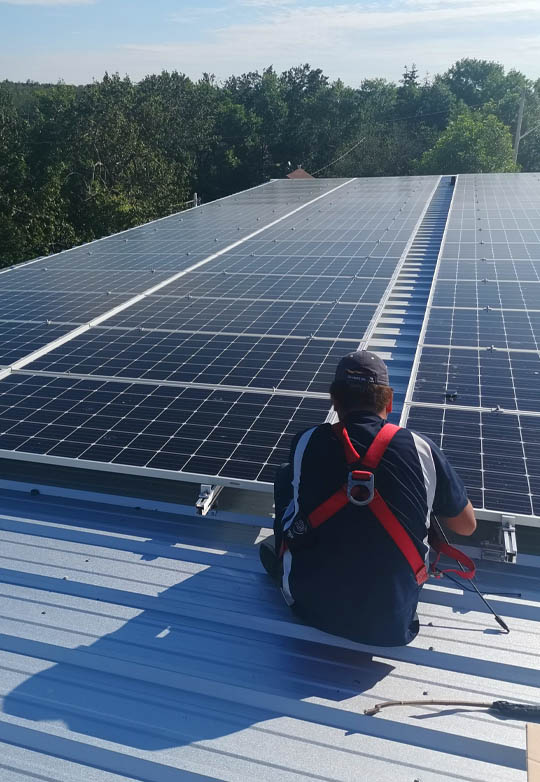
Construction process: DC install

Now you are ready to move into the installation. Typically you will start off the rooftop installation. This is known as the DC install. The rooftop is considered the DC portion and includes the racking, solar modules and DC wiring.
You can use different kinds of racking – flush-mount, balustrade or tilted – for the panels. You always want your solar panels to be facing generally due south. If your roof is flat, you don’t want the panels to be completely flat, so you can use tilted racking systems.
Construction process: AC install

The AC portion of the installation includes inverters, disconnects and AC wiring.
For an AC system, you would: Install solar inverters. Install AC wiring, disconnects and other components.
Construction process: LDC approval for grid connection

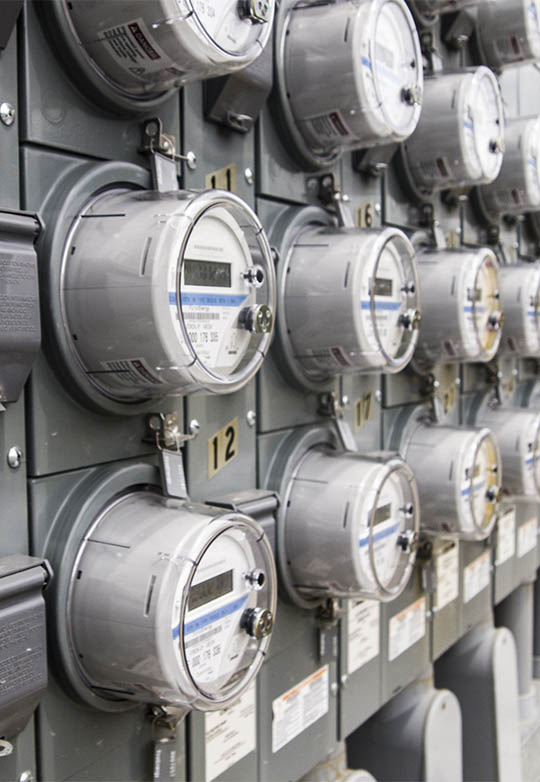
By this stage, the approval to connect to the grid should be ready. This means getting the approval to energize. Inform the LDC that the project has been completed, that it has passed the Electrical Safety Authority inspection and is ready to energize. When the LDC is satisfied that all requirements have been completed, the company’s officials will come and swap out the meter with a bi-directional meter.
The project can now begin generating power.
A net metered project will require a bi-directional meter. A non-exporting project will not require a bi-directional meter – as there is no need to have a meter that measures any level of export.
Construction process - LDC approval for grid connection – 1: Application process for LDC (Under 10kW)
At the start of this lesson, we had talked about the size of the project. Let’s look into that in a little more detail.
If your solar project is under 10 kW, you do not need an electrical engineer to approve your solar design. Projects under 10 kW also have a engineer to approve your solar design. Projects under 10 kW also have a much easier connection approval process with local distribution companies.
The sequence of steps to follow for getting approvals is:
You will submit a Form C Application to HONI. HONI will respond approximately one month later with an Offer to Connect agreement. First Nation will then need to sign the Offer to Connect. You will send payment for connection costs to HONI. Finally, you will confirm the receipt of the package to HONI and proceed to construction.
Note: The connection approval process is a lot easier if your system is 10 kW or less. So designing a system above 10 kW only makes sense if you have to do a really large system, like 100 kW, for instance. However, we would recommend not doing a 15 kW system if a 10 kW system could be done instead, because you probably could have a simpler connection approval process with the latter.
Construction process - LDC approval for grid connection – 2: Application process for LDC (Over 10kW)

The process for approval to connect to the grid is different and longer if your project is over 10 kW.
You have to submit a Pre-Fit Application to HONI. HONI will respond in approximately one week. HONI will provide a Consultation Response Letter with feeder details and the Distribution Operating Map. You have to submit a Connection Impact Assessment. This includes a Form B, Study Agreement, HST Exemption, a Single Line Diagram (an electrical drawing done, and then sealed and stamped, by an engineer) and data sheets to HONI. You will send payment for connection costs to HONI. These costs are higher than those for projects under 10 kW. HONI will respond within 60 days with the approved CIA.
This entire process can last from three to six months.
Electrical Safety Authority (ESA)

Let’s now talk a bit about the Electrical Safety Authority, or the ESA, which we had spoken about earlier.
The ESA comes in during, and at the end of, the installation to conduct safety checks and ensure that your installation is compliant with the Ontario Electrical Code.
All electrical work requires a permit to be pulled and can only be obtained through the ESA by a contractor. All wiring must be completed by a licensed electrician and follow the Canadian Electrical Code. The contractor will arrange for inspections of the work being done. The ESA will issue the permit and conduct the inspections.
The ESA will schedule two inspections. The first is to see if the preliminary plans are good. You can then proceed with the installation. ESA will then come back for a final inspection, and inform you if the work is compliant with the Ontario Electrical Safety Code.
If it is, you will get a Certificate of Acceptance. If it’s not, you will get a list of deficiencies which you have to correct and have ESA return to site. The ideal situation would be if you could carry out the corrections on the spot to get your final Certificate of Acceptance.
It is highly advisable to get the Certificate of Acceptance from the ESA for your records.
Commercial Operation Date (COD)

You are now reaching the final steps of the solar installation process.
You have reached a stage where you can get the Commercial Operation Date, or COD. This is the date on which the system is turned on and becomes fully operational with the grid. The COD means that the system has been energized and it is producing power. The task now is to monitor the system for the rest of its life.
The customer will now receive electricity credits generated by the system starting from the COD.
COD timelines depend on the local distribution company’s availability.
Substantial Completion

Here, we need to circle back to ‘Substantial Completion’, which we saw earlier.
This term usually means that all the AC or DC installation is complete. You have received your Authorization and Certificate of Acceptance from the Electrical Safety Authority and you have successfully completed the commissioning tests. You have also got the ‘as-built’ single line drawings of the system. We will explain ‘as-built’ a little later.
At this stage, the project is not fully closed out but everything has been completed. The facility is fully built and performance tested, with only minor punch list items left to be completed.
Change Orders
As a project manager, you might have to deal with ‘Change Orders’ in the solar installation process.
Step 1
The first steps to finalize a ‘Change Order’ would be estimating the actual cost or savings from the change.
Step 2
The next step would be to have a description of the scope change, including any impact on existing materials. Include details of how the new scope of work is going to change the original scope of work.
Step 3
If the parties involved agree to the changes, you want a written, signed order between the parties that outlines the change.
Importance of change orders

Change Orders are important because, at the end of the project, you want the design to reflect what was actually built. So if there is any Change Order that has happened along the way, you will want to request from your contractor what is known as an ‘as-built’ drawing.
An ‘as-built’ is basically the original drawing with marked-up notes on it, say with a red marker, that outline what changes were made to the original design. This is helpful for future reference. If anyone is trying to refer to the designs, say, to do some operations and maintenance tasks on the system, they will be able to do so efficiently because you have the accurate and final version of the design.
Financing: Equity vs. Debt
As a solar project manager, besides the design and construction of the project, you also have to decide on suitable financing options.
There are two kinds of financing you can look at for solar projects.
Equity is when an external company puts money or assets into the project in exchange for a percentage ownership of the project. This option is usually more common for larger solar projects, typically not for projects under 10 kW. It is common for larger projects to have multiple vested interests, companies that have ownership stakes in the project because they have put in equity in the project.
Another possible route you can take to finance your project would be to take on Debt. This is when a company borrows money through a loan. If you don’t have the capital upfront to pay for the entire project, you will have to take on a bit of debt. This has to be repaid, typically with interest.
You should do a financial analysis to see which option is more suitable for your project. Your interest payments should not outweigh the benefits of the savings that you would get through your project.
Financial analysis 1: Return On Investment (ROI)
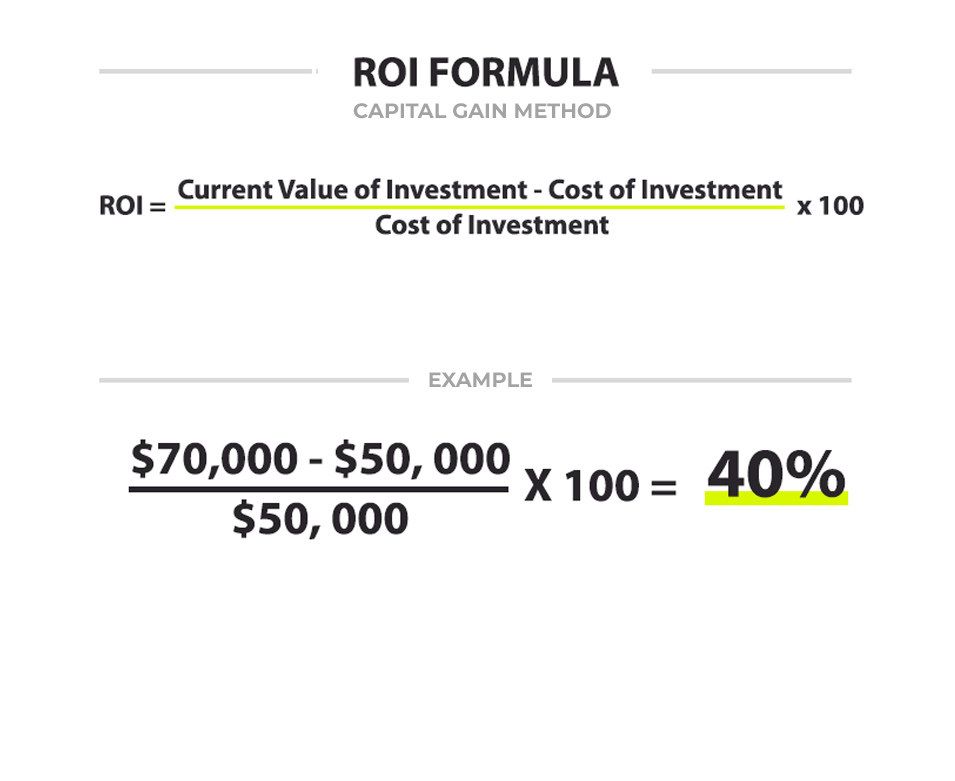
Speaking about financial analysis, there are some terms that you should be aware of as a solar project manager.
Return on investment, or ROI, is a tool to measure the effectiveness of your investment. ROI measures how effective your investments into your business are at generating income, and how is it going to save the buildingn energy costs. A project with a large ROI is better than a project with a smaller ROI.
You can see the example formula here. The ROI is calculated by taking the current value of the investment, subtracting the cost of the investment, which is divided by the total cost of the investment times a 100%. In this example, the ROI is working out to be 40%, which is a pretty good number in terms of ROI.
ROI is usually represented as a ratio or percentage and is obtained by dividing the gain or net benefits earned from the investment by the cost of the investment.
Financial analysis 2: Internal Rate of Return (IRR)

The Internal Rate of Return, or IRR, is another tool you can use to measure how effective your investment is going to be. The difference between ROI and IRR is that in the latter you do not use the net present value. Instead, you use the annual returns, or the cash flow returns, as your indicator.
The graph shows an IRR calculation. Let’s say that at the start of your project you have an initial negative cash flow because it cost, say, $50 for the project. Every year you are getting a certain amount of revenue back. In Year 1 you get $20 back, and in Year 2 you get $15 back. The orange line tracks the difference between the two. At the start you were down $50 but by the end of Year 2 you are actually down $15. Let’s say in Year 3 you reach your break-even point. This means that you have recouped the initial cost of the project and now you have a positive cash flow because you are starting to make profits on your investments.
IRR is another tool to use if you are considering whether your project makes financial sense.
Financial analysis 3: Payback period
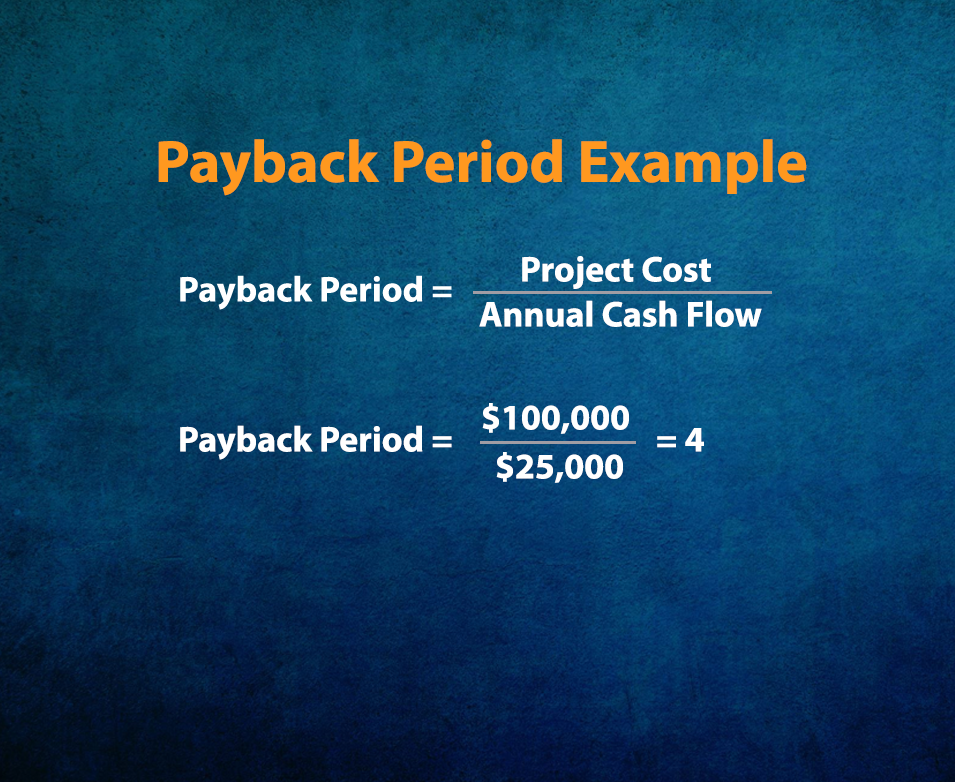
Calculating the Payback Period is another way to measure how effective your investment is. This is the period in which the investment of a project is recovered. Projects with shorter payback periods are desirable.
This is a comparatively easy calculation to do. It’s like a ‘back-of-the-envelop’ calculation to figure out if a project is worth looking further into.
It is calculated by dividing the project cost by the annual cash flow (or annual savings, depending on the type of project), as shown in this example. So let’s say your project cost $100,000 and every year you make $25,000 in revenue. This means your payback period is four years. So in four years you would have recovered $100,000, which means you have broken even and everything after that is profitable. Four years, by the way, is a really great payback period.
On the other hand, if in your calculations it turns out that your payback period is fifteen years, then you might decide that this project is not the best use of your investment or capital. You may decide not to invest in this project. Or maybe look for alternative funding sources where you could improve the payback period by reducing upfront project costs.
As a reference point, seven to eight years is generally the break-even point. Anything under that is considered a good break-even point and anything over that is considered questionable.
Grants, loans and rebates
You can access alternative sources of funding for your project by looking into grants, loans and rebates.
Grant
A Grant is a sum of money given to an individual, business or organization that does not need to be repaid. An example of this would be the IEP project, where IESO has agreed to provide an 80% grant to the project. That is great because this money does not need to be repaid. This kind of situation is obviously ideal.
Loans
Loans are another way to access funding. Note that loans are money that is borrowed and are expected to be paid back with interest. So this is not an ideal situation. But it is an option if you need to make up the difference to get a project off the ground.
Rebate
A Rebate is a partial refund of the cost of a service or item. An example of this could be the Canada Greener Homes. If you sign up for it, you can get up to $5,000 rebates for various energy efficiency upgrades.
Available funding sources

Some funding sources you could look into for your project.
Indigenous Services Canada (ISC) Independent Electricity System Operator (IESO) Natural Resources Canada (NRCan) There used to be a project called Save on Energy but this is probably closed now Enbridge Gas (HER+ Program), but this probably won’t apply to you Canada Greener Homes Grants
Legal documentation and terms

As a project manager, you will likely deal with legal documentation. There is legalese and terms within those documents that you need to be aware of.
Certain words – such as Contractor, Owner, Agreement, Project Approval/Completion Date, Effective Date, etc. – are capitalized in legal documentation because these are referred to as ‘defined terms’.
Usually, at the start of a legal document, there will be a list of definitions. For example, a legal document might say: “From here on, this person will be referred to as the Contractor, or such and such person will be referred to as the Owner.” By using such generic terms the document avoids having to repeat specific terms and names over and over again in a contract.
Do some research about how these legal documents work. Always do your due diligence before entering into any legal documentation with any contractor or supplier.
Project management skills – 1

So far, we have discussed the crucial role project managers play in overseeing the different aspects of a project. In addition, they must possess a diverse skill set, including technical expertise, financial acumen and legal knowledge.
Leadership
Leadership skills are one such essential skill. As a project manager you have to lead and direct staff. You should be able to set a clear vision, communicate it effectively and create a culture of accountability and excellence. You should be able to work with team members to achieve shared goals and objectives.
Teamwork
Being a good team player and working effectively within a group – is another skill. You will have a team for doing this project, so your ability to work collaboratively with other team members will help to successfully close the project.
Creativity
This is the ability to think outside the box, to come up with innovative solutions to problems. Think of solutions that might not be obvious at first. Don’t be hesitant about challenging assumptions. Often, a project manager might spend most of their time on thinking of problems and how to mitigate them with solutions creatively. Creativity leads to effective problem solving, allowing you to tackle issues from new and different angles.
Initiation
Initiation skills are equally important. A project manager will have to initiate rather than follow. You don’t want to be taking directions all the time. You want to look at the project and be able to plan: Where is the project at? What needs to be done or followed up now? What are the critical path activities? How can I move forward most efficiently?
Communication
Communication skills are essential to convey your messages, ideas and concepts clearly and effectively. You should be able to understand the needs of your team members and respond to, or with, appropriate feedback. Effective communication skills build strong relationships with colleagues and stakeholders.
Project management skills – 2

Some additional skills required are as follows.
Cost management
This is another important skill. You have to be able to understand how budgets work and how you can manage your expenses so that you do not overshoot your budget.
Time management
You need to be able to prioritize activities. We had mentioned critical path activities earlier – activities that are the most important. You should be able to decide what is important and what you need to focus on so that the project doesn’t slip in terms of schedule. A Gantt chart is a useful planning and time management tool to do this. We will discuss Gantt charts a little later.
Task management
This can also be aided by using Gantt charts. You will want to prioritize tasks, schedule tasks sequentially or in parallel, set up the critical path activities, etc.
Project scheduling
This is a component of time management. You want to be able to schedule things actively to manage your time. Effective scheduling helps you avoid the stress of missed deadlines.
Risk Management
For a project manager, understanding risk management and reduced liability is a critical skill. You have to constantly be thinking about possible risks to the project. You should be able to identify, assess and control your liabilities by implementing risk management strategies.
Critical thinking
This is similar to creative thinking. You need to be able to look at a situation from all angles. Don’t get tunnel vision on one particular item. You need to be able to take a step back and look at your project as a whole and assess it: What is the big picture here? What do I need to do today to ensure that this project keeps moving forward successfully?
Community Energy Champion
Until now we have been discussing the roles and responsibilities of a hypothetical project manager. If you could step into the shoes of a project manager, that would be great.
At this time, the only responsibilities that JAZZ Solar would ask of you as either an Energy Team member or the Energy Champion would be to act as an effective liaison with the community and to push the project forward.
Let’s discuss some things you can do to help the project move along if you are not a project manager but a Community Energy team member.
Community Energy Champion responsibilities – 1

As a Community Energy Champion or team member, you could identify key individuals and resources needed to coordinate with for projects. An effective tool for this is an organizational chart, using which you could identify key individuals and resources for project communications. Your chart could have the names, contact numbers and other details of everybody who might be involved in the project, for instance. This would help facilitate things for project managers to keep the project moving forward smoothly.
You could also inform staff and the community in advance of significant events, so that coordination is easier. This may, for instance, be a contractor’s entry into the community, construction timelines, trenching, power shut off, etc. JAZZ Solar relies on local resources such as you to help assimilate such information.
Community Energy Champion responsibilities – 2

There are additional responsibilities you could shoulder as a Community Energy Champion.
Identify qualified and trustworthy contractors or resources who can provide competitive pricing. Coordinate to get building plans, including access for contactors, with building managers. Assist with advising on-site visitors of any health and safety protocols during construction. Help with logistics needs – for example, with parking, portable bathrooms, garbage disposal, accommodation, and so on. Track tasks and timelines and flag any concerns with scheduling. Take notes of project-related meetings and actions. Monitor and report community issues to the project team – for example, issues raised by community members or building managers. Follow up with contractors for progress updates. Monitor and help with material storage and worksites. Help with drafting and submitting project applications and requests for funding.
Energy Support Team – 1
Apart from the Community Energy Champion, the Energy Support Team also plays a crucial role in community energy projects.
As a member of the Energy Support Team, you could be an asset to the project team by providing your expertise in trade, political, environmental, property management, etc.
For instance, you could help identify any gaps in the analysis done by the CEC. Or you could validate the CEC’s findings before approaching Chief & Council for input. You could stay informed of any Council policy, asset or changes that impact the project and relay that back to the project team.
Energy Support Team – 2

As part of the Energy Support Team, you could bring forward any political or administrative changes that impact the project timelines, such as changes in building use.
You could stay up-to-date on the EPC (Engineering, Procurement and Construction) progress and help in obtaining any upcoming approvals from Council.
You could also keep track of any notices of financing delays such as cash flow and debt, including potential solutions.
Community energy champion review
What is a responsibility you could shoulder as a Community Energy Champion or as part of the Energy Support Team?
Project manager: Financial analysis review
Why should project managers do financial analyses in solar projects?
Hydro One Indigenous Relationship Officer

Establishing a relationship with your Indigenous information resource person from Hydro One is important.
You could approach them with details about projects that you currently have ongoing in your community, or about projects that you want to do. It is the resource person’s responsibility to be aware of what is going on in the community and help support you, maybe even advocate on your behalf, if needed.
You can get the following support from your resource person as well.
Electrical Safety Authority (ESA)

Project meetings are held at regular intervals during the project lifecycle to touch base and to follow up on the previous actions that were discussed. Deadlines, targets and project progression are also discussed at the meetings. When projects are taking place, it is advisable to schedule meetings with the energy team at least bi-weekly, in some cases every week.
All project meetings should be captured in Meeting Minutes that note down action items, targets, deadlines, project timelines, and everything that was said or agreed upon. Following the meeting, the Minutes should be distributed to all the relevant people.
Scheduling with Gantt charts
A Gantt chart is an effective project management tool to map out all project plans by organizing project tasks – engineering, procurement, construction -- as a visual timeline. It maps start and end dates, and links tasks if they are dependent on each other. It shows the order in which project tasks will be completed, when they are due and their duration, among other details.
A Gantt chart consists of a timeline with dates on the horizontal axis. The different tasks to be done are listed on the vertical axis. The blue squares indicate when those tasks will be executed. The width of the blue squares shows the duration of the activity.
This example of a Gantt chart looks like a staircase because this project manager has decided that each of these tasks have to be sequential, that is, one task has to be completed before another can begin. This particular chart is a good example of a critical path with dependencies – where a particular task cannot start until others have been completed.
However, it is recommended that, wherever possible, tasks are executed in parallel if they are not part of a critical path.
Visit this YouTube link to get more info about Gantt charts:
Gantt charts
Benefits of Gantt charts

Gantt charts are beneficial because they help you visualize the project. They provide a visual representation of your project laid out over the next few weeks or months.
It’s also a good way of relaying information to other team members. This way other team members can visualize not only their own timelines but the entire project as well.
Gantt charts enable you to schedule tasks, see how tasks are connected (overlapping activities and dependencies), allocate resources, track and follow up tasks, avoid resource overload and measure progress. Gantts also help build community inputs into tasks. Sharing Gantt charts also enhances team cohesion as well as project planning and management.
Milestone deliverables and payments

As the project progresses, you will also be tracking milestone deliverables and payments. Depending on the scope of work and program, milestones are structured according to different deliverables and payment schedules. Contractors are paid as they go, according to the schedule worked out.
You should build in payment schedules in your contracts. These are usually based on milestones.
Here is an example of a chart with four milestones. In the right column, the payment schedule starts off with 15%. It progresses to 35% once the equipment has been ordered, and to 40% once there is substantial completion of the project installation. The final 10% you would hold off until you have done your final commissioning and completion.
A takeaway from this slide is not to pay your contractors everything upfront. We would recommend against paying them even 50% upfront. You should start off with a small amount to get the project off the ground. Give your contractors larger payments as the project progresses.
This is one way of mitigating risks. Staggered payments mean that contractors are less likely to run away with the money or not complete their scope of the work, thus playing havoc with your budget.
Summary

Before we close this module, let’s have a quick recap of what we have discussed.
Project management means planning, organizing and managing a project to achieve pre-defined and specific project objectives. Project managers have to not only plan and document the project, but also execute it effectively within the constraints of scope, time and budget.
Projects require a team of people to come together to focus on specific goals or outcomes. As a result, a project manager’s responsibilities include drawing up contracts, managing schedules, allocating and handling resources, setting and tracking timelines, and communicating with stakeholders.
A project manager needs a wide range of skills. These could range from technical skills and good business awareness to people management skills and other soft skills as well to manage their team and the project.
At this time, it is expected that this is new for you and that you don’t have any background in project management. However, we hope that you will be ready to join us in this project soon.
With this, we have reached the end of the project management module.
Post-test
Answer these to see what landed. We’ll point you back to anything worth a second look.